

How To Repair Windows 7 64 Bit
Every operating organisation needs an occasional repair job, and Windows vii is no exception. Whether the source of the problem is corrupt data, a particularly brutal piece of malware, or some other serious issue, you'll occasionally have to reinstall your copy of Windows.
Wiping your hard drive and performing a fresh installation can be a huge headache; just fortunately in that location's a way to repair a corrupt Windows seven installation while keeping all your programs, personal data, and user accounts intact. With Windows 7 you tin perform an in-place upgrade installation to repair a flaky existing install. Though technically designed to upgrade older Windows operating systems similar Vista, the in-place upgrade installation option can also exist used to repair an existing installation of Windows 7.
Note that you must perform the in-identify upgrade process from inside Windows; if your PC can't fully boot to the Windows desktop, this repair guide is not for you. A few other limitations come upwards later in the commodity, so be sure to read the unabridged guide thoroughly before attempting to repair your decadent copy of Windows 7. Performing a repair installation should be your final resort, and you lot should consider it only if you accept already removed spyware from your PC, reinstalled your drivers, and unsuccessfully tried to restore from an earlier (working) version of Windows seven using System Restore.
Prepare Your PC for Windows 7
Before performing a repair installation, you should have a few precautionary measures to ensure that the process goes smoothly. The outset stride is to back upwards all of your critical files to an external storage device. Though the repair process is unlikely to neglect or to render whatsoever of your files unrecoverable, it's ever a smart idea to support your data.
After yous've backed upwards your system's important data, we recommend uninstalling any tertiary-party security software such as firewalls or antivirus applications. You tin always reinstall them after completing the repair process; but since y'all'll exist initiating this process from within Windows, you need to remove any security applications that actively scan files. Yous should also download and shop all of the drivers that your system needs to function—specially the network controller, which tells your network adapter how to access the Internet.
After backing up all of your drivers, clean out all of the temporary files and junk data that have accumulated in Windows seven over the course of prolonged employ. To do this, click the Start push, and in the Search field type Folder Options; and then press Enter. In the Folder Options window, click the View tab and select Show hidden files, folders and drives; then click OK.
Adjacent, initiate a Deejay Cleanup past opening the First menu and selecting Reckoner; right-click your chief bulldoze (the C: drive by default) and open the Properties carte. Select the Disk Cleanup utility in the lower-correct portion of the menu, and select Clean up system files. The Disk Cleanup utility should take a few moments to rescan the drive. Next, click the More than Options tab, and select Clean Up in the 'System Restore and Shadow Copies' section at the lesser of the menu. In the dialog box that appears, click the Delete button; and so navigate back to the Disk Cleanup tab, ostend that all items in the Files to Delete listing are checked, and click OK. The Disk Cleanup utility should clear out outdated organization files, temporary information, and other digital detritus. Depending on how much junk information is on your drive, this footstep may take anywhere from a few seconds to a few minutes.
Later running the Disk Cleanup utility, you should clean out a few folders manually. Open the C: drive again, and double-click the Windows folder. Whorl down the list of folders and delete any files in the Prefetch and Temp folders. Exist sure to delete but files within those two folders and not the folders themselves. Adjacent, navigate back to the C: drive, and double-click the Users binder. Within the Users folder, double-click first the folder for your detail username, and then the AppData folder (if you don't see the AppData binder, you must not take selected 'Prove hidden files, folders and drives' earlier), the Local folder, and finally the Temp binder. Delete all of the files in this Temp binder as well; so restart your organisation.
Install Windows 7
Having completed the prep work, yous can safely begin the Windows 7 repair installation. You'll demand a Windows seven installation disc that matches the version of Windows already installed on your organisation, and you'll need at least 10GB of complimentary space on the drive where you intend to install the new version. The installation media must be able to deploy a clean Windows installation, which means that custom recovery discs from your system manufacturer or another OEM probably won't work.
To begin the repair installation process, insert the installation media and run Setup (if it doesn't launch automatically). In the Setup window, click the Install Now button, and you'll have the choice of continuing the installation with downloadable updates or without them. If your Net connexion is working, you lot should probably choose to download the updates, merely y'all tin can choose whichever pick suits your fancy. Adjacent you must accept the terms of the license and and so cull whether to perform an Upgrade installation or a Custom installation. You're repairing a corrupt install, so cull Upgrade (the Custom option won't save your personal files or settings).
After you've selected the Upgrade option, the installer will perform a compatibility check; your system should laissez passer with flying colors, since you were already running the same version of Windows 7, but double-cheque to ostend that there aren't whatsoever red flags. In one case the compatibility cheque is done, printing the big Next push, and the Upgrade/Repair installation process volition begin.
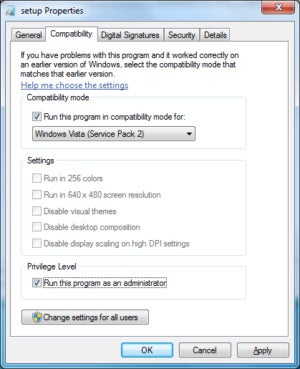
If the Upgrade choice is unavailable for some reason, yous tin still perform a repair by using a simple workaround: Right-click the Setup file earlier y'all run information technology, and select the Properties menu. From there, navigate to the Compatibility tab, and check Run this program in compatibility manner for:. Then select Windows Vista (Service Pack two) from the drop-down carte. Be sure to also check the box at the bottom labeled Run this program as an administrator; then click OK. Run the Setup utility again, and the upgrade installation option should exist available.
The next few stages of the repair process don't require whatsoever user intervention. The installer will get together data well-nigh your system, re-create the necessary installation files, and then movement any personal files or programs over to the fresh version of Windows 7. This process isn't especially fast (a typical repair install took about 40 minutes on our exam car), only the amount of fourth dimension required will vary from system to system depending on how much data needs to be transferred from one Windows vii installation to the other.
Though most of the data and programs installed on your original copy of Windows vii should make the movement the new copy, a few things (such as custom themes and sounds) will not. You'll have to reinstall those after completing the fresh install.
 Windows
 In the Compatibility tab of Setup Properties, arrange for the plan to run in compatibility style for Windows Vista Service Pack 2.
Clean Up Later the Windows vii Install
One time the upgrade installation process is complete, you'll be prompted to activate your fresh install and answer a few basic setup questions (fourth dimension and engagement, network settings, and then forth). At the stop of this setup process Windows, will assess your machine's functioning to generate an appropriate Windows Experience Index rating, and and then perform a few concluding updates and repairs to complete the installation. One time the unabridged installation process is consummate, you should poke around in your new version of Windows seven to verify that all of your files are intact and all of your applications are working properly. Run Windows Update to ensure that your fresh copy of Windows 7 is entirely upwards to date.
To wrap up the installation procedure, y'all need to articulate out the old junk data left over from your corrupted version of Windows 7. Windows will store this information in 2 system folders, labeled $INPLACE.~TR and $WINDOWS.~Q. If everything is working properly, you can delete these two folders, along with another archived data. Follow the steps we outlined earlier to perform a disk cleanup, select Make clean upward arrangement files, delete the two folders, and you're done. Congratulations, you've successfully brought your Windows 7 PC back from the brink of abuse! Make sure to go on this guide handy, in case you ever need to repair a corrupted copy of Windows 7 again.
Note: When you purchase something after clicking links in our articles, we may earn a small committee. Read our affiliate link policy for more details.
Source: https://www.pcworld.com/article/477982/how-to-repair-a-corrupt-windows-7-installation.html
Posted by: marshallfrochat.blogspot.com
0 Response to "How To Repair Windows 7 64 Bit"
Post a Comment